Creating My First Django Application Part 2
Hello Folks , Earlier we installed Django in our system and successfully created our first project and a application.
Visit Creating My First Django Application Part 1
Installation for Windows and Linux is same.
Run Server to start the application
python manage.py runserver
After running the above command a lightweight server will start running at http://127.0.0.1:8000
Now open browser and open http://127.0.0.1:8000

Creating View
This is where your application views are. A view function, or “view” for short, is simply a Python function that takes a web request and returns a web response. This response can be the HTML contents of a Web page, or a redirect, or a 404 error, or an XML document, or an image, etc.
- Locate the views.py from the your app folder.
- Open views.py using an Editor of your choice
- Write the following Code
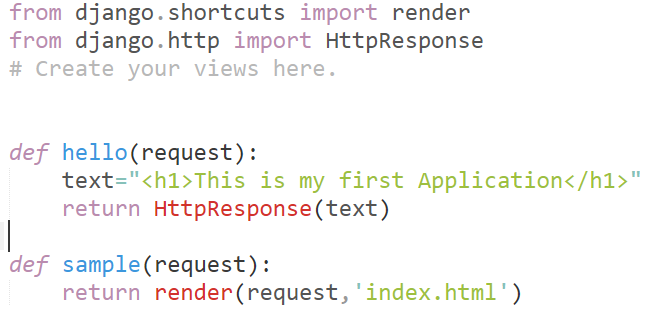
from django.shortcuts import render
from django.http import HttpResponse
# Create your views here.def hello(request):
 text=”<h1>This is my first Application</h1>”
 return HttpResponse(text)
Each views.py is responsible for doing following 3task
- Returning a HttpResponse object containing the content of the page you request.
- Render a HTML file and send as a HttpResponse
- Raise an exception such as Http404,503 etc
- Rest depends on your requirement such as calling other function or requesting other urls
It is as important that you configure urls.py in your project folder so that django map the url with the view you just created.
URL Mapping
A clean, elegant URL scheme is an important detail in a high-quality Web application. Django lets you design URLs however you want, with no framework limitations.
- Locate the urls.py from the your project folder.
- Open urls.py using an Editor of your choice
- Write the following Code
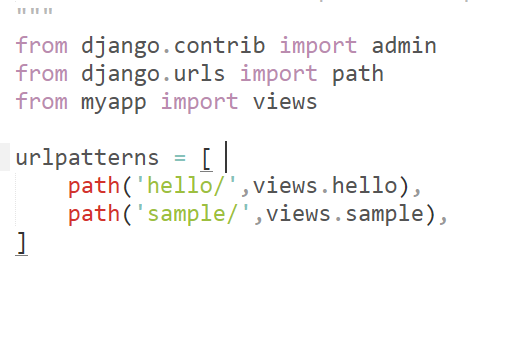
from django.contrib import admin
from django.urls import path
from myapp import viewsurlpatterns = [
 path(‘hello/’,views.hello)]
One can add the views in url patterns using following
Function views
- Add an import: from my_app import views
- Add a URL to urlpatterns: path(‘’, views.home, name=’home’)
Class-based views
- Add an import: from other_app.views import Home
- Add a URL to urlpatterns: path(‘’, Home.as_view(), name=’home’)
Including another URLconf
- Import the include() function: from django.urls import include, path
- Add a URL to urlpatterns: path(‘blog/’, include(‘blog.urls’))
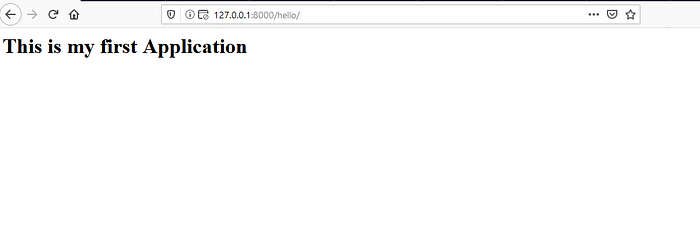
Open Browser and open http://127.0.0.1:8000/hello
Render HTML files in views
- To enable templates in django, create a new folder in you app directory “templates”
- Django will fetch the .html file automatically from the directory
- Add a index.html (or any other named file in newly created directory)
<HTML><HEAD>
<TITLE>This is a Sample Django Application</TITLE>
</HEAD><BODY BGCOLOR=”FFFFFF”>
<HR>
<a href=”http://gtu.ac.in">Link Name</a>
is a link to another nifty site
<H1>This is a Header</H1>
<H2>This is a Medium Header</H2>
Send me mail at <a href=”nareshkr.22@gmail.com”>
nareshkr.22@gmail.com</a>.
<P> This is a new paragraph!
<P> <B>This is a new paragraph!</B>
<BR> <B><I>This is a new sentence without a paragraph break, in bold italics.</I></B>
<HR>
</BODY>
</HTML>
4. Open views.py and add a created a view
5. Open urls.py and add a url entry in it
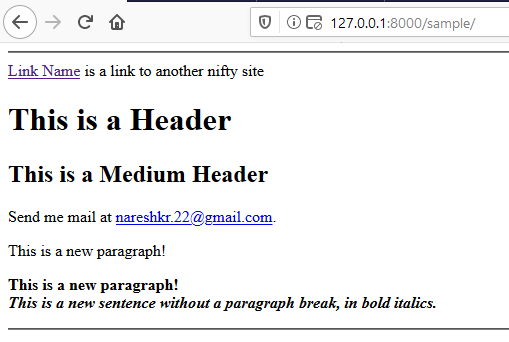
Lets have a look how django have processed our html request

Open Browser and open http://127.0.0.1:8000/sample
Move to Next Part Creating My First Django Application Part 3
References
- https://docs.djangoproject.com
- https://tutorialspoint.com/
- Django Unleashed — Book by Andrew Pinkham